Hardening Kanban
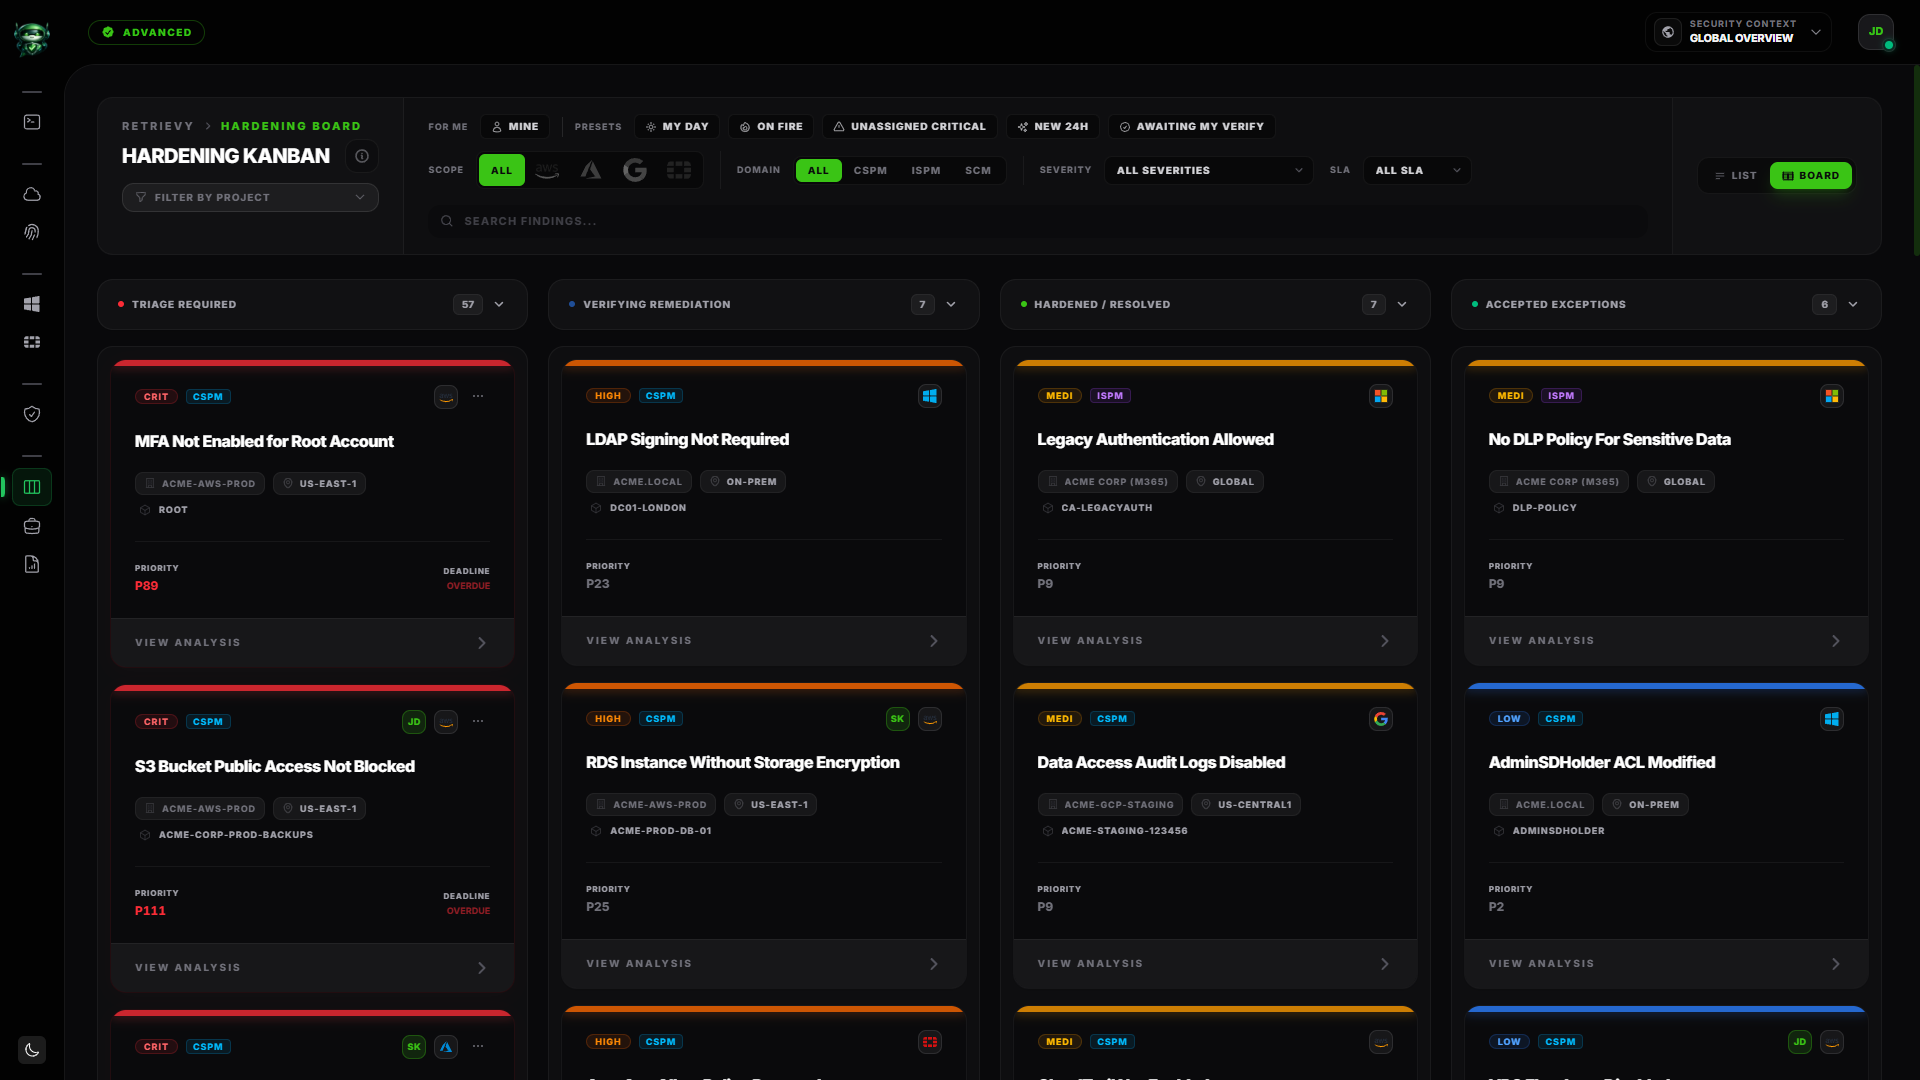
The Hardening Kanban is where you actually work findings. Drag a card from Triage Required to Verifying Remediation to tell Retrievy you fixed it. Click Accept Risk on a card to move it to Accepted Exceptions with an approver chain. When the next scan confirms a fix, Retrievy promotes the card into Hardened / Resolved automatically.
Before you start
- A workspace with at least one connected data source.
- Findings present in the system (a scan has completed).
- The Move cards and manage Kanban workflow permission (under the Kanban Board group in Settings → Roles & Permissions) if you want to perform bulk actions. Without it, you can still view, filter, and act on cards one at a time.
The four columns
The board has four columns, in this order:
| Column | What lives here |
|---|---|
| Triage Required | Active findings. Open or reopened, severity Critical, High, Medium, or Low. These are the ones counting against your Retrievy Index. |
| Verifying Remediation | You clicked Resolve Finding on these. Retrievy is waiting for the next scan to confirm the fix. The status badge reads Pending Verification. |
| Hardened / Resolved | The scan confirmed the fix. Terminal state. Read-only. |
| Accepted Exceptions | You decided not to fix these. They're tracked in the Security Exceptions register with an approver and an expiry. |
What a card shows
Every card on the board carries the same information block:
- A severity badge in the top-left corner: CRIT, HIGH, MED, or LOW.
- A domain badge for the source module: CSPM, ISPM, or SCM.
- A reopened indicator (
↩plus a count) if the finding has come back to Triage Required after being resolved. - The assignee chrome (avatar) if the finding is owned by someone.
- The card title (the finding name).
- The account or workspace it relates to, the region, and the resource identifier.
- A priority score displayed as
P<number>under the PRIORITY label. - An SLA deadline under the DEADLINE label. Reads OVERDUE,
<hours>h left, or ON TRACK depending on where the finding sits against its policy. - A quick-action menu on cards in Triage Required with the Resolve and Accept Risk buttons inline.
- A View Analysis button that opens the drawer.
The detail drawer
Click any card (or View Analysis) to open the drawer. It has four tabs:
- Overview. What the finding is, when it was first seen, where it lives.
- Remediation. How to fix it, with copy-paste CLI commands and vendor documentation links.
- Evidence. The raw scanner output and the audit record.
- Assignment. Who owns the finding, who's been notified, history of ownership changes.
The footer buttons change based on the finding's current state:
| Finding state | Footer shows |
|---|---|
| Open or Reopened | Accept Risk and Resolve Finding. Resolve Finding is a double-click confirmation. Click once and the button says Click again to confirm for three seconds. |
| Pending Verification | Read-only status: Marked for resolution · awaiting scanner verification. |
| Risk Accepted | Read-only status with expiry date plus a Manage in Registry link to the exceptions register. |
| Resolved (Verified) or Resolved (Auto) | Read-only status: Verified by scanner on <date>. |
Filters and presets
The toolbar above the board has more controls than fit comfortably on one screen. Group them as follows.
Quick presets
Five preset chips give you instant filters. Click any one to apply, click again to clear:
| Chip | What it shows |
|---|---|
| My Day | Your open and active findings, sorted by SLA. |
| On Fire | Critical severity with a breached SLA. Across the whole workspace. |
| Unassigned Critical | Critical findings nobody owns yet. |
| New 24h | Findings first seen in the last 24 hours. |
| Awaiting My Verify | Your findings sitting in Verifying Remediation. |
Toggle the Mine button to restrict every other filter to findings assigned to you (direct or co-assignee).
Scope and domain
- Scope: dropdown filters by cloud provider or platform (AWS, Azure, GCP, OCI, M365, Active Directory, FortiGate). All resets.
- Domain: buttons restrict to one module: All, CSPM, ISPM, SCM.
Severity and SLA
- Severity dropdown: ALL SEVERITIES, CRITICAL, HIGH, MEDIUM, LOW.
- SLA status dropdown: ALL SLA, ON TRACK, WARNING, BREACHED.
Search
The search box has the placeholder SEARCH FINDINGS.... It matches against title, resource identifier, and account name.
Project
The Filter by Project dropdown narrows the board to findings inside a single remediation project.
Board view vs list view
Two toggle buttons in the top-right switch the layout.
Board
The default. Four columns side by side. Cards are draggable from Triage Required to Verifying Remediation. You cannot drag into Hardened / Resolved or Accepted Exceptions (those columns are write-locked because scanner verification or explicit risk acceptance is required to land there).
List
A flat table of every finding the filters match. Columns:
| Column | What it shows |
|---|---|
| Finding & Resource | Title plus the affected resource. Default sort. |
| Deployment | Account, region. |
| Remediation | The priority score. Sortable. |
| Current State | The status badge. Sortable. |
A count strip above the table reads Showing <count> of <total> findings.
In list view, an extra status dropdown appears with these options:
ACTIVE FINDINGS, ALL STATUSES, TRIAGE REQUIRED, REOPENED, VERIFYING, RESOLVED (VERIFIED), RESOLVED (AUTO), RISK ACCEPTED.
The sort dropdown adds: SEVERITY, PRIORITY SCORE, SLA DUE, DAYS OPEN, FIRST SEEN.
Bulk actions
List view supports multi-select. Click the checkbox on each row, then act on the selection. The counter at the top of the screen shows <count> selected. Available bulk actions:
- Mark Resolved. Moves every selected finding to Verifying Remediation. Requires the Move cards and manage Kanban workflow permission.
- Add to Project. Drops the selection into an existing remediation project. If no projects exist, the modal shows No projects found. Create a remediation project first..
Cancel clears the selection.
Drag and drop
On the board view, drag any card from Triage Required to Verifying Remediation. The card jumps columns immediately and the affected finding's status flips to Pending Verification.
You cannot drag into Hardened / Resolved or Accepted Exceptions. Those columns are locked. Moving a finding into them requires a scanner verification (for resolution) or the formal Accept Risk flow (for exceptions).
Empty states
- Empty column on the board: the column shows Empty Area.
- No findings match the current filters on list view: the table shows No Findings Detected with a clock icon.
- Add to Project dropdown when you haven't created any projects: No projects found. Create a remediation project first..
How this affects your Retrievy Index
Moving findings through the board is how you raise your Retrievy Index. The math is in How the Retrievy Index is calculated, but the short version:
- Cards in Triage Required with Open or Reopened badges are part of your weighted failure count. They pull the score down.
- Moving a card to Verifying Remediation (status Pending Verification) removes it from the weighted failure count immediately. The card stays visible but stops affecting the score.
- Moving a card to Accepted Exceptions (status Risk Accepted) also removes it from the score, but the underlying risk is recorded in the Security Exceptions register with an approver and expiry.
- When the next scan confirms a fix, the card moves to Hardened / Resolved. The score stays at the improved value (the finding is gone for good unless it reopens).
A Critical in Triage Required has the largest impact. Resolving it lifts the score most.
Troubleshooting
Symptom: A card I dragged to Verifying Remediation bounced back to Triage Required. → Fix: Drag-and-drop requires the Move cards and manage Kanban workflow permission (under the Kanban Board group in Settings → Roles & Permissions). Without it the drop silently reverts. Ask your workspace admin to grant the permission, or use the Resolve Finding button inside the drawer instead (which is gated by a separate check).
Symptom: Resolve Finding in the drawer requires me to click twice. → Fix: This is intentional. The first click changes the button to Click again to confirm for three seconds. Click again within that window to commit.
Symptom: I expected the board to update when a colleague resolved a finding, but it didn't. → Fix: Reload the page. After a network blip the board can take a few seconds to catch up.
Symptom: I see a finding in the list view that I can't open or act on. → Fix: You probably don't have access to the data source that produced it. Workspace role and per-source scoping both apply. Check your role in Account → Roles and permissions.