Remediation Projects
A Remediation Project is a scoped collection of findings you've decided to fix as a unit. It has owners, a deadline, a baseline Retrievy Index at the start, and a per-item verification trail. When you finalise the project, you get an executive PDF you can hand to leadership or to a customer.
The Retrievy UI frames projects with mission-control language ("Mission Control", "Hardening Sprint", "Mission Findings Inventory"). That's the language a workspace admin sees. It's deliberate: a remediation project is meant to feel like a delivered engagement, not a backlog.
Before you start
- A workspace with at least one connected data source and findings ingested. With no findings the page shows Zero Data / Synchronized instead of a project list.
- The Create new remediation projects permission to create a new project.
- The Edit, delete, and manage remediation projects permission to mark items resolved, accept risk on an item, finalise the project, or delete it.
- The Generate and download PDF/SOW reports permission to download the per-project PDF when the project is complete.
Every toggle above lives in Settings → Roles & Permissions: the project ones under the Remediation Projects group, the report one under the Reports & Exports group.
Where to find it
Open Remediation Projects in the main navigation. The link only appears on plans that include the Remediation Projects module (see plan feature matrix).
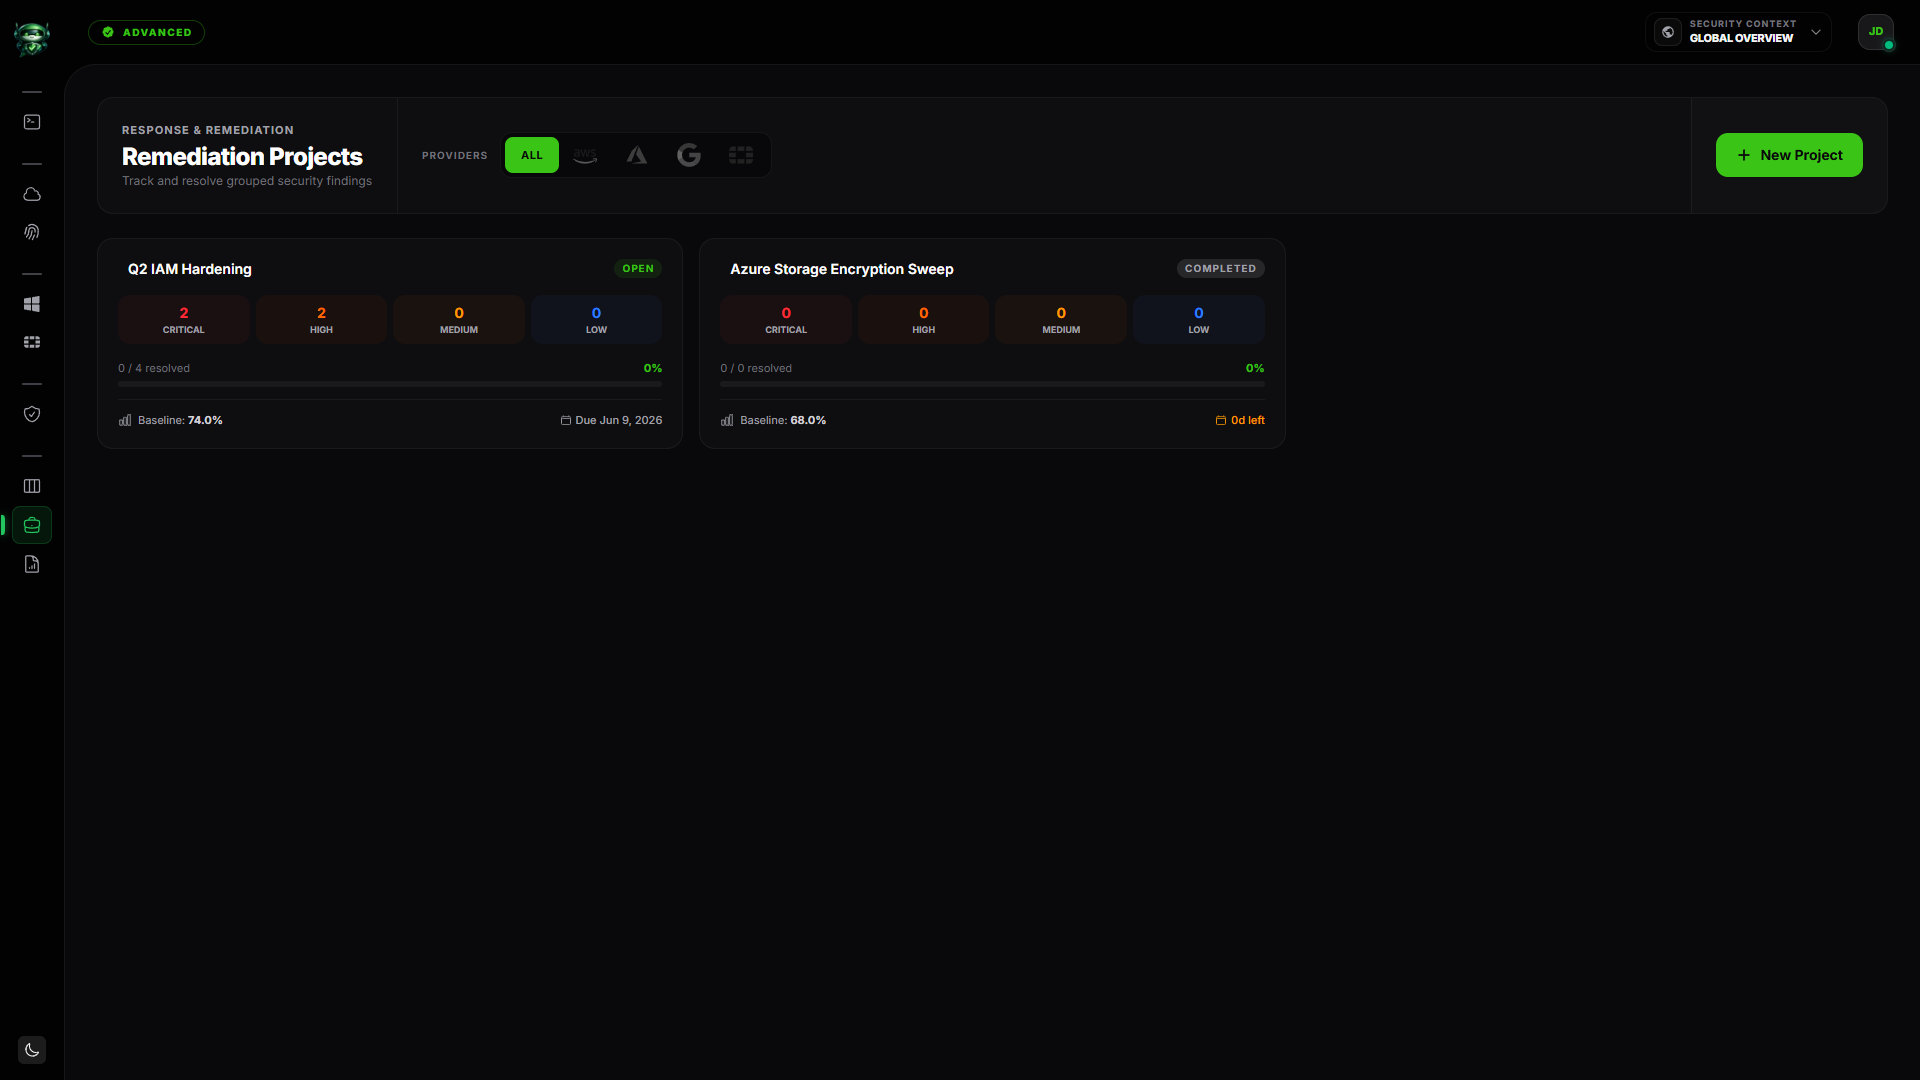
The page header reads Remediation Projects with the subtitle Track and resolve grouped security findings.
The project index
Projects render as cards in a grid. Each card shows:
- The project name and a status badge: OPEN (active project) or COMPLETED (finalised).
- Provider icons for every cloud account or platform in scope (rolled up to three with a "+N" if more).
- A severity breakdown of the project's findings: Critical / High / Medium / Low badges with counts.
- A progress bar with the current
<resolved> / <total>count and a percentage. - The baseline Retrievy Index: the score at the moment the project was created (T-0).
- The due date, or an Ongoing indicator if the project was created without one.
Above the grid, filter pills let you scope by provider: All, AWS, Azure, GCP, OCI, M365. If you've activated the account-scope filter at the workspace level, the projects list respects that too.
Two empty states you may see:
| When | What it says |
|---|---|
| No findings exist anywhere | Zero Data / Synchronized. Remediation planning requires detected vulnerabilities. Run an infrastructure audit to identify high-risk findings that can be grouped into hardening projects. |
| Findings exist but no project has been created | Zero Projects / Managed. No remediation projects have been initialized. Group related security findings into projects to assign ownership, track progress, and systematically harden your posture. Includes a Create First Project call-to-action. |
Creating a project
Click Create Project (or Create First Project on the empty state). The wizard opens with the title Create Remediation Project and the subtitle Group findings by scope and track remediation progress over time. Three steps run across the top: Details → Scope → Review.
Step 1. Details
| Field | Required | Notes |
|---|---|---|
| Project Name | Yes | Free text. The placeholder shows e.g. AWS Production Hardening Q3 2026. |
| Objective (optional) | No | A short description of the goal. Shown later on the project page as the Mission Briefing. |
| Executive Summary (optional) | No | A higher-level narrative used in the PDF report header. Visible to stakeholders. |
| Ongoing project, no target deadline | No | A toggle. If on, the date picker disappears and the project shows as Ongoing on the index card. |
| Target completion date | Conditional | Required unless you flipped the Ongoing toggle. Date picker. |
| Providers in Scope | Yes (min 1) | Checkbox grid of every active cloud account and FortiGate account in the workspace. Each tile shows the provider icon, the friendly account name, the provider badge, and how many findings that account currently has. |
| Assignees (optional) | No | Checkbox grid of active users in the workspace. Multi-select up to 50. Avatars and emails shown. |
Step 2. Scope
This step decides which findings the project actually covers.
Domain filter (radio):
- All Findings (default)
- Cloud Infrastructure (CSPM)
- Identity & Access (ISPM)
- Servers & Network (SCM)
Severity levels (checkboxes, default Critical and High pre-selected): Critical, High, Medium, Low.
Ownership Scope toggle. Off includes every finding that matches the filters. On (Only unowned) excludes findings that already have an owner or co-assignee. Useful when you want a project to pick up the loose ends, not the work someone else has already taken.
Compliance Framework dropdown. Optional single-select; restricts the project to findings mapped to a chosen framework (CIS, NIST CSF, MITRE ATT&CK). Leave empty to ignore framework mapping.
Advanced filters further down:
- Check IDs (the top 100 check IDs in the workspace by frequency).
- Asset labels (whatever labels your cloud resources carry).
- Regions (AWS, Azure, GCP regions present in the workspace).
A live preview table at the bottom of step 2 shows how many findings currently match, with columns for check ID, severity, domain, and last-seen date. Updates as you toggle filters.
Static vs dynamic scope. A static project (default) snapshots the matching findings at creation time. New findings detected later don't join the project on their own. A dynamic project (the toggle is called dynamic scope) re-evaluates the same filters on every visit, so new matching findings appear automatically.
Pick static when the project is a committed engagement with a fixed scope. Pick dynamic when you want a continuous watch list (for example, "all open Critical findings in our prod AWS account, ongoing").
Step 3. Review
A summary of the inputs. Confirm to create the project. The wizard closes and you land on the new project's page.
Inside a project
The project page (the Show view) is the day-to-day work surface.
Header and Mission Briefing
The breadcrumb at the top reads Mission Control (a link back to the index). The page heading is the project name. To the right: a status badge (Active while open, Closed when finalised) and a days-remaining indicator (or N Overdue in red when past due).
If you wrote an Objective in step 1, it appears under the header as Mission Briefing. If a consultant has added a narrative note to the project, a callout box appears titled Mission Briefing :: Consultant Notes with the text in italics.
Stats cards
Three cards summarise progress at a glance:
- Baseline. Your Retrievy Index at T-0, the Critical count at start, and total findings in scope.
- Progress Gauge. Total Remediated, Security Exceptions, Awaiting Action, plus a circular progress wheel showing the percentage done.
- Post-Remediation State. The projected (or finalised) Retrievy Index, a delta indicator showing the lift, and a synchronisation hash so you know the snapshot is current.
Mission Findings Inventory
The findings table is titled Mission Findings Inventory. Above the table, status filter tabs let you scope the rows:
- ALL: every item.
- BACKLOG: pending items, the work that's still open.
- FIXED: items you've marked resolved.
- SKIPPED: items you've marked as ignored without an exception (rare).
- EXCEPTED: items where you accepted the risk via the Security Exception flow.
An Open in Kanban View link drops you into the Hardening Kanban pre-filtered to the project, so you can work on the items in their normal Kanban context.
Table columns:
| Column | What it shows |
|---|---|
| Finding Identity | Title, check ID, service, region, NIST flag if relevant. |
| Cloud Account | Provider icon, friendly account name, account ID. |
| Severity | Colour-coded badge (Critical, High, Medium, Low). |
| Status | One of: VERIFYING (blue, pulsing) when waiting for scanner re-check, HARDENED when scanner-confirmed, EXCEPTION when ignored, POLICY EXCEPTION when formally accepted, REOPENED if it came back, PENDING otherwise. |
| Last Seen | The scan date and a relative-time helper (3 days ago). |
| Synchronization Actions | Hover-only icons: Commit Remediation (check), Security Exception (no-symbol), Audit (open the per-item state history). |
Per-item actions
When the project is open and an item is PENDING, three actions live on row hover:
- Commit Remediation marks the item as resolved on the Retrievy side and transitions the underlying finding to Pending Verification. The next scan confirms the fix and the badge flips to HARDENED.
- Security Exception opens a modal titled Exception Protocol Justification with a textarea that requires a justification. Submitting creates a linked entry in the Security Exceptions registry and transitions the finding to Risk Accepted.
- Audit opens the Audit Trail drawer showing every state transition on the underlying finding.
Clicking a row (not the hover icons) opens the full finding drawer. In addition to the standard Overview, Remediation, Evidence, and Assignment tabs, the drawer adds a Consultant Evaluation textarea that auto-saves per-item observations to the project. The drawer footer has the same two actions, this time as labelled buttons: Accept Risk (gray) and Resolve Finding (brand green).
Finalising a project
When the work is done (or as done as it's going to be), click Finalize in the project header. The Finalize Hardening Sprint modal opens. It asks for an Executive Conclusion in a textarea (this becomes part of the PDF report) and shows two counters at the bottom:
- Remediated findings: how many items got the Commit Remediation treatment.
- Authorized Exceptions: how many items moved to Security Exception.
If there are still pending items, a warning notes that those findings will keep their owners and stay in the workspace, just no longer in this project. The project doesn't auto-finalise when every item is done; finalising is always an explicit click.
On confirm, the project status flips to Closed, the final Retrievy Index is snapshotted, and the toast reads Mission Accomplished! Executive report is now ready for export.
Once a project is Closed you can no longer add items, change item states, or reopen it. The Export Report button appears in the header. Click it to download the per-project PDF. The file is named Retrievy_Hardening_Report_<project-name>_<Ymd>.pdf. See Reports for what's inside.
Deleting a project
Open the kebab menu (the three dots in the top-right of the project page) and click Delete project (red). A confirmation modal appears. Deletion is permanent. Requires the Edit, delete, and manage remediation projects permission.
Note: deleting a project doesn't touch the underlying findings. Co-assignees attached to findings via this project are preserved if those users are still on other active projects. The toast on a successful delete reads Project "<name>" was deleted. Co-assignees on shared findings are preserved for users still on other active projects.
What is NOT in the projects module today (intentional)
A few things worth knowing up front:
- No bulk-add from Kanban. You can filter the Kanban to a project's scope (via the project filter dropdown) but there's no "select these cards and add them to a project" gesture. Static-scope projects pick up findings via the create-wizard filters. Dynamic-scope projects pick up findings via the live-evaluated filters.
- No due-date email reminders. Projects don't have an expiry-warning mailer the way Security Exceptions do. If the team needs reminders, set a calendar entry.
- No reverse transition. Once a project is finalised it stays Closed. If you finalised by mistake, create a new project with the same scope.
- No bulk operations inside a project. Item actions are one row at a time.
These are real gaps. Surface them to your team before adopting projects as the primary workflow.
How this affects your Retrievy Index
The project itself doesn't move the score directly. What changes the score is the per-finding work the project tracks:
- Clicking Commit Remediation on a project item flips the finding to Pending Verification. That stops it from counting in the weighted failure count, and the global Retrievy Index rises by the severity weight.
- Clicking Security Exception on a project item creates a registry entry and flips the finding to Risk Accepted. Same arithmetic: it leaves the weighted failure count and the score rises.
- When the next scan confirms a remediated item, it lands in Resolved (Verified). The score stays where it already moved to. The finding is gone for good unless it reopens.
- A finalised project snapshots a Post-Remediation Retrievy Index on the project page so leadership can see the lift you delivered. That snapshot is the global score at finalisation time, not a per-project sub-score.
To raise the global Retrievy Index through projects, push items to Commit Remediation (preferred) or Security Exception (when a fix isn't possible). See How the Retrievy Index is calculated.
Permissions
Every toggle below lives in Settings → Roles & Permissions, under the group named in the second column.
| Toggle | Group | What it grants |
|---|---|---|
| View remediation projects | Remediation Projects | Open the Remediation Projects index and any project's detail page. |
| Create new remediation projects | Remediation Projects | Opens the create wizard and saves a new project. |
| Edit, delete, and manage remediation projects | Remediation Projects | Marks items resolved, accepts risk on items, edits per-item observations, finalises a project, deletes a project. |
| Generate and download PDF/SOW reports | Reports & Exports | Downloads the per-project PDF on a finalised project. |
The Remediation Projects module also needs to be included on your plan; see plan feature matrix. Workspace admins have every permission by default.
Troubleshooting
Symptom: I created a project with the Static scope and a new Critical finding landed yesterday that should belong to it. It's not in the project. → Fix: Static scope is a snapshot at creation time. New findings don't join. Either create a new project with Dynamic scope, or re-create the project to include the new finding.
Symptom: The Finalize button is disabled. → Fix: Either you don't have Edit, delete, and manage remediation projects, or the project is already Closed. The button only appears when status is OPEN and you have the right permission.
Symptom: I marked a finding Commit Remediation but it's still showing VERIFYING a day later. → Fix: The badge stays VERIFYING until the next scan confirms the fix. If your scans run on the default daily schedule, allow up to 24 hours. To force a re-check, run Scan Now on the source data source (cloud account, agent, etc.).
Symptom: Export Report is missing from the project page. → Fix: The export button only appears when the project status is Closed. Finalise the project to enable it. You also need the Generate and download PDF/SOW reports permission.
Symptom: I deleted a project and now the assignees disappeared from some findings. → Fix: The deletion cleans up co-assignees attached only via the deleted project. Users who are co-assignees on other active projects keep their attachment. Re-assign manually if you need a specific user back on those findings.