Create your workspace
A workspace in Retrievy is your isolated environment. Every scan, every finding, every user, and every report belongs to one workspace and stays there. Each workspace gets its own subdomain (something like acme-corp.retrievy.com) and its own billing relationship.
This page walks the full sign-up: from landing on the public site to having a workspace ready for its first scan. Plan on about 10 minutes.
Before you start
- An email address you control. You will verify it.
- A credit card if you want a paid plan up front, or a redeem code if your Retrievy representative gave you one for a proof of concept.
- The workspace name you want for invoices, reports, and the URL. Once set, the name and the URL slug derived from it are permanent.
Stage 1. Create your account
Open https://retrievy.com and click Get started in the top-right. The registration page offers two paths:
Continue with Google or Microsoft
Click Continue with Google or Continue with Microsoft at the top of the page. Tick the I agree to the Terms and Privacy Policy box first, otherwise the buttons stay dimmed.
You land back on Retrievy with your account already created. Skip to Stage 2 below.
Register with email
If you do not want to use SSO, scroll past the divider that reads or register with email and fill in:
| Field | Notes |
|---|---|
| Full Name | Whatever you want to appear in the workspace user list. |
| Work Email | Used for sign-in and for receiving Retrievy emails (security alerts, trial reminders). |
| Password | At least 8 characters. The form rejects common passwords. |
| Confirm | Re-type your password. |
Tick I agree to the Terms of Service and Privacy Policy at the bottom, then click Create Account.
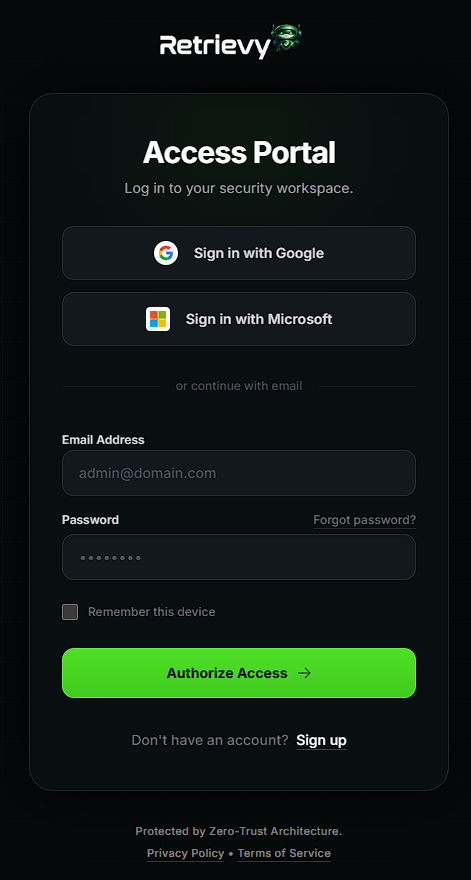
Retrievy sends a verification email. The subject line is Verify your email to activate your Retrievy workspace. Click the link inside. The link expires in 60 minutes. If you miss the window, sign in (you can sign in without verification) and request a new email from the Profile page.
While your email is unverified, you can browse the dashboard but you cannot connect data sources or invite teammates. Verifying is a one-time step.
Stage 2. Deploy your first workspace
After sign-up Retrievy redirects you to Managed Environments, the central dashboard that lists every workspace you own. On a brand new account this list is empty and the Deploy Environment wizard opens automatically. If the wizard ever closes before you finish, click the lime Deploy Environment button in the top-right of the dashboard to reopen it.
The wizard is three steps. The header shows Deploy Environment, the rocket icon, and a Step N of 3 counter. A three-segment progress bar sits underneath.
Step 1. Workspace identity
The first card asks What should we call your workspace? A small amber Permanent badge sits next to the question because this name is part of the workspace URL and cannot be changed later.
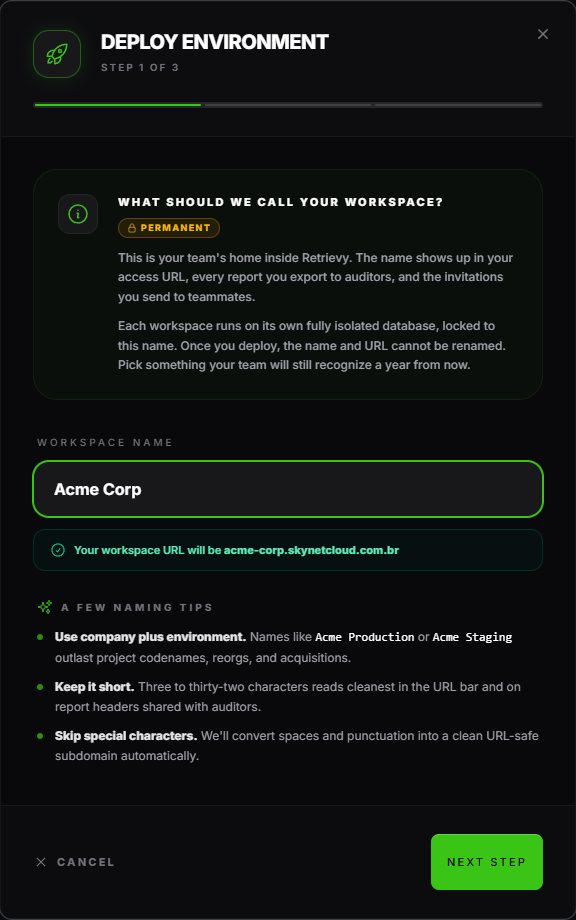
Type your workspace name. As you type, Retrievy shows the URL preview beneath the field (for example acme-corp.retrievy.com). The name has three rules:
- Three characters minimum, 255 maximum.
- Letters, numbers, spaces, and hyphens only. Retrievy converts to a URL-safe slug for the subdomain.
- Cannot be a reserved subdomain like
api,www, oradmin. Reserved names show a red error inline and disable Next Step.
If the slug you wanted is already taken or is within the cooldown window of a recently purged tenant, Retrievy appends a random suffix and the URL preview shows the final form before you continue.
Click Next Step.
Step 2. Pick a plan, or use a redeem code
Step 2 has two paths. The plan picker is the default; a single link at the bottom of the card switches to the redeem-code path.
Plan picker
At the top of the card, choose Monthly or Yearly billing (yearly is roughly 20% cheaper across all plans). Below the toggle, the plan cards stack vertically:
| Plan | Monthly | Data sources | Seats | Notes |
|---|---|---|---|---|
| Essentials | $149 | 2 | 3 | Cheapest paid tier. No PDF exports, no SSO, no audit log. |
| Advanced | $349 | 4 | 10 | Adds Executive + Technical PDF reports, SSO, audit log, FortiGate dependency graph. |
| Build Your Own | from $400 | up to 50 | up to 50 | Graduated per-source pricing (first 5 at $60, next 10 at $55, the rest at $50). Includes every Advanced feature. |
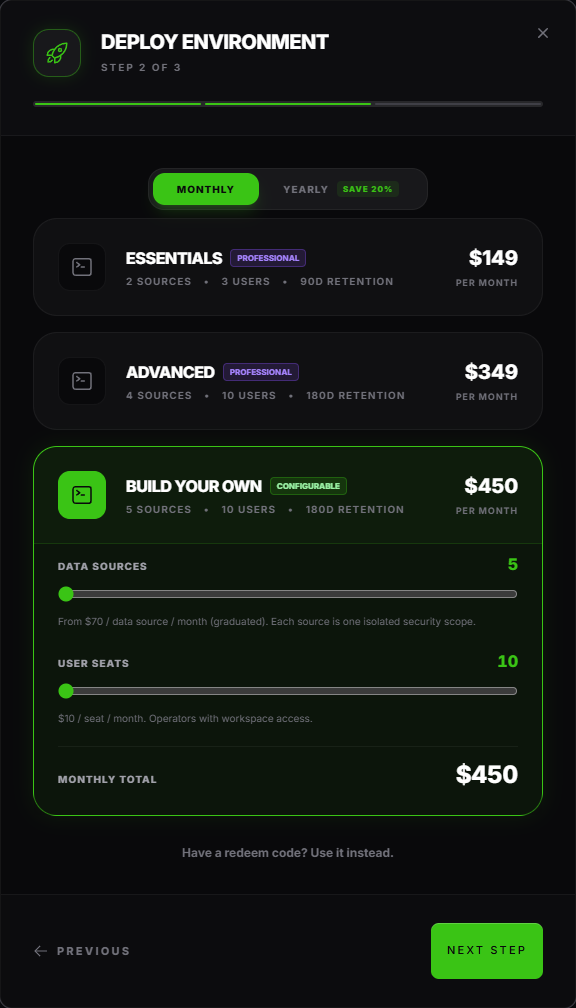
Click a card to select it. Essentials and Advanced auto-advance the wizard the moment you click. Build Your Own keeps you on step 2 and reveals two sliders (Data Sources and User Seats) plus a live monthly total. Drag the sliders to the size you want and confirm the total clears the $400 floor.
Redeem-code shortcut
If your Retrievy account representative gave you a code for a proof of concept or partner-led trial, scroll to the bottom of the plan list and click Have a redeem code? Use it instead.
The plan cards are replaced by a Redeem a Trial Code card. Paste your code into the Redeem Code field (format XXXX-XXXX-XXXX-XXXX), click Check, and Retrievy shows a green verified-preview card with the plan, seat count, data-source allocation, retention, and trial duration. The full redemption flow, including the eight customer-facing error messages and the rate-limit behaviour, is documented at Activate a workspace with a redeem code.
Click Next Step.
Step 3. Fulfillment
The third step depends on which path you took in step 2.
Paid plan. The fulfillment screen summarizes the plan and total, then redirects you to Stripe Checkout when you click Fulfill & Deploy. Promotion codes work in Stripe Checkout. After payment clears, the wizard closes and the workspace card on the dashboard transitions through Awaiting Payment → Provisioning Infrastructure → ready in 15 to 30 seconds.
Redeem code. The fulfillment screen reads Activate Trial Workspace and summarizes the trial plan, the duration, and (for Build Your Own codes) the data-source and seat counts. Click Activate Trial. No card is collected. The workspace card shows Provisioning Infrastructure for 15 to 30 seconds, then flips to a normal workspace card with a yellow Courtesy License badge that stays visible for the duration of the trial.
In either path, the workspace card on Managed Environments has an Access Tenant button that opens the workspace at <your-name>.retrievy.com.
Stage 3. First sign-in and the Goal Selector
The first time you click Access Tenant, the Command Center replaces itself with the Goal Selector wizard. Two short steps:
3.1 Pick your timezone
Every scheduled scan, snapshot, and trend chart aligns to your workspace timezone. Pick the one your security ops team works in. You can change this later under Settings → Organization → General Settings.
3.2 Pick what you want to scan
The second step is a multi-select with three goals. Tick any combination:
- Cloud (and a sub-pick of AWS, Azure, GCP, OCI, or M365)
- Active Directory (on-prem AD via the Retrievy Agent on Windows)
- FortiGate (firewall posture via the Retrievy Agent)
Your picks decide what the onboarding checklist surfaces next. Tick everything you actually plan to scan; you can change your mind later.
Click Save. The Goal Selector closes and the Command Center renders for the first time. An Onboarding Checklist pins to the top of the page with the next steps for each goal you picked (install the Retrievy Agent, connect cloud accounts, and so on).
Stage 4. Set up two-factor authentication
Before you invite teammates or paste any credentials into the workspace, set up 2FA on your account:
- Open Profile from the user menu.
- Find the Two-Factor Authentication section.
- Scan the QR with an authenticator app (Authy, 1Password, Google Authenticator).
- Confirm the six-digit code.
2FA is optional for individual users by default. A tenant-admin can require it for everyone from Settings → Organization → General Settings. Strongly recommended on day one.
What you have now
- A workspace at
<your-name>.retrievy.comwith your account as the tenant-admin. - A verified email and, if you set it up, 2FA on your account.
- A plan (Essentials, Advanced, Build Your Own, or a redeem-code trial) with seat and data-source quotas.
- A choice of platforms to scan, surfaced as the Onboarding Checklist on the Command Center.
You are ready to connect your first data source and run a scan. That is the next page: Run your first scan.
Troubleshooting
Symptom: The verification email never arrived.
→ Fix: Check spam. If it is not there, sign in to Retrievy anyway and request a fresh email from Profile. If your company filters external email aggressively, ask your IT team to allow-list [email protected].
Symptom: The Google or Microsoft sign-up button is dim and unclickable. → Fix: Tick the I agree to the Terms and Privacy Policy checkbox below the buttons. SSO sign-up is gated behind that consent.
Symptom: I picked Advanced but the Executive PDF button on the Reports page is still disabled. → Fix: The plan change usually propagates within a minute. If it has been longer, sign out and back in to force a permission refresh. If still disabled after that, contact support.
Symptom: I typed a workspace name and the URL preview shows a red error reading That name is reserved or That URL is unavailable while a previous tenant cools down.
→ Fix: Pick a different name. Some short names (api, www, admin, and similar) are reserved by Retrievy. Names that belonged to a recently deleted workspace are unavailable for a cooldown period; the inline notice will tell you exactly when the name frees up.
Symptom: The workspace card on Managed Environments sticks on Provisioning Infrastructure for more than two minutes. → Fix: Provisioning normally takes 15 to 30 seconds. If it stays longer, the card flips to a red Provisioning Failed state with a Retry Infrastructure Setup button. Click it. If retry also fails, contact support at [email protected] with the workspace name.
Symptom: The Goal Selector reopens every time I refresh the workspace.
→ Fix: Reload once more after clicking Save. If your network blocks WebSocket connections, the page does not update live and a reload is required to pick up the saved goals. The IT team can also allow-list wss://*.retrievy.com.
Related
- Run your first scan for the next step in the flow.
- Plans and pricing for the full plan picker walkthrough.
- Activate a workspace with a redeem code for the no-card trial path.
- Roles and permissions for what a tenant-admin can do.
- Command Center for the page you land on after the Goal Selector.