Invite your team
Once your first scan has landed and findings are flowing into the Hardening Kanban, it's time to bring the rest of your team in. This page covers inviting users, picking the right role for each, and turning on Single Sign-On if your plan includes it.
You don't need to invite everyone on day one. Start with the people who'll actually triage findings and report up to leadership. Add more later as the workflow settles.
Before you start
- The Invite, edit roles, and remove tenant users permission (under User Management in Settings → Roles & Permissions). The workspace founder has it; everyone else needs a role that includes it.
- Enough seats on your plan for the people you're about to invite (Essentials: 3, Advanced: 10, Build Your Own: up to 50). See Plans and pricing.
- A clear idea of who needs full access (tenant-admin), who needs read-only across one cloud account, who needs PDF export rights, etc. The role catalog in Roles and permissions is the reference.
Step 1. Plan your roles
Before you click Invite User, take five minutes to decide who needs what. A workspace with three real roles is easier to govern than one with every user as tenant-admin.
A common starting set:
| Role | What it does |
|---|---|
| tenant-admin (the default) | Full access. Use for the workspace owner and one or two trusted seconds. |
| security-engineer (custom) | All view permissions across CSPM, ISPM, SCM. Plus Move cards and manage Kanban workflow, Approve, reject, and manage security exceptions, Create / Edit, delete, and manage remediation projects, Trigger on-demand security scans, Generate and download PDF/SOW reports. No settings or user management. |
| compliance-officer (custom) | View on all modules. View compliance frameworks (NIST, CIS, MITRE) and Export compliance reports. Generate and download PDF/SOW reports. No state changes (no Kanban or Exceptions management). |
| viewer (custom) | Just the View all… (or scoped) toggles for whichever modules they need. No settings, no state changes, no exports. Good for executives who want to log in occasionally. |
Create those custom roles first (you only need to do it once). The full create-a-role walkthrough lives on the Roles and permissions page.
Step 2. Invite each user
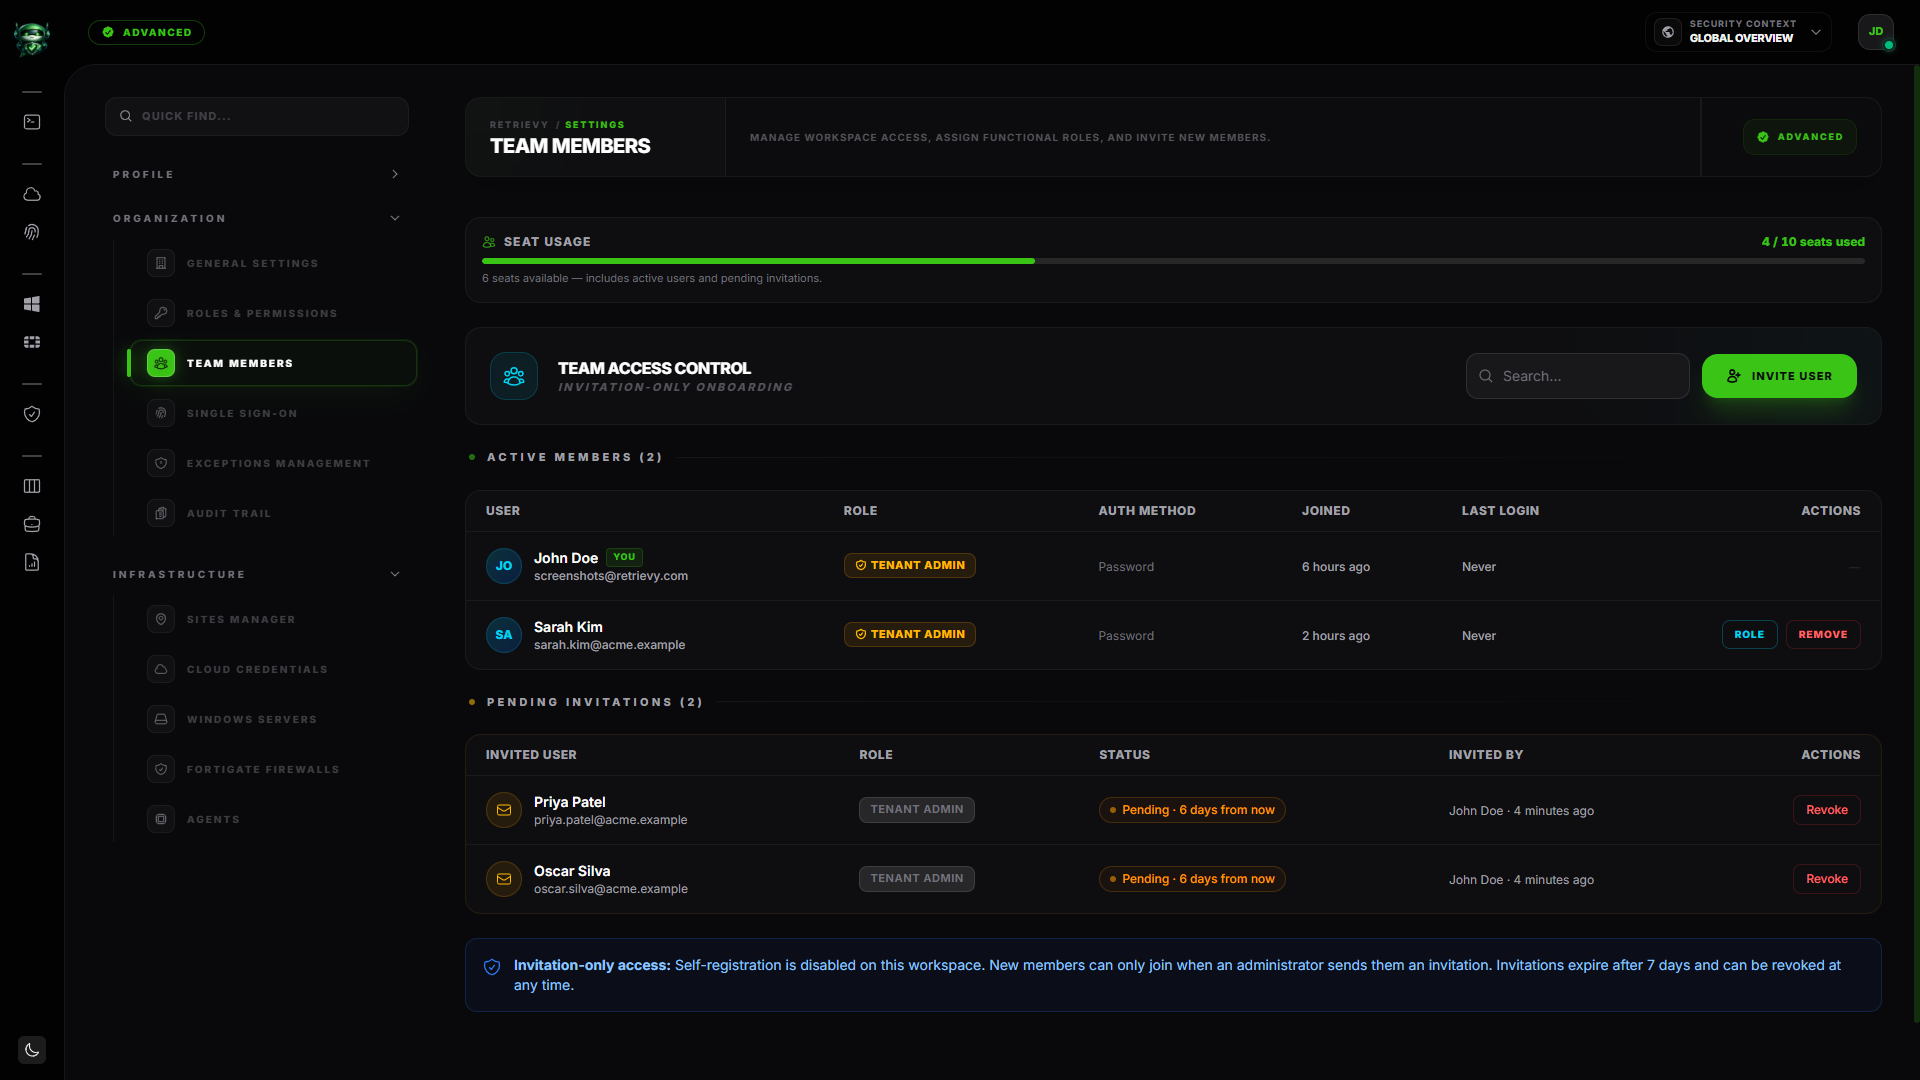
Open Settings → Organization → Team Members. The page H1 reads Team Members.
Click Invite User. The modal asks for:
| Field | Notes |
|---|---|
| The user's work email. The invite link is sent there. | |
| Assign Role | Dropdown defaulting to tenant-admin. Change it to the role you planned in Step 1. |
Click Send Invite. The user receives an email with a sign-up link valid for a limited time.
The user appears in the team list immediately with a Pending marker. They count against your seat allowance from the moment you send the invite, not from the moment they accept.
A meter above the user list shows <N> seats available (includes active users and pending invitations) so you can see how many seats you have left.
If you hit the seat ceiling, the Invite User button disables itself with the label Seat Limit Reached: Upgrade. The page also surfaces Seat limit reached on the <plan name> plan. Upgrade your plan to invite more team members. Click through to Billing to resize the plan.
Step 3. Change a user's role later
People shift roles. To update an existing user's role:
- On Team Members, find the user's row.
- Click the Role button on that row.
- The Change Role modal opens with a dropdown of every available role.
- Pick the new one and click Update Role.
The change takes effect immediately. The user's next page load reflects the new permissions.
Each user can only carry one role in the UI today. If you need a user to have a hybrid (security-engineer for cloud accounts but read-only on FortiGate), create a custom role that combines the right permission slice instead of trying to assign two roles.
Step 4. Set up SSO (Advanced and Build Your Own only)
If your plan includes sso (Advanced or Build Your Own), you can let your team sign in with Microsoft, Google, or Cloudflare instead of email + password. SSO config lives at Settings → Organization → Single Sign-On.
The full SSO setup is provider-specific. Each provider page walks the IdP-side app registration and the Retrievy-side mapping. (SSO provider setup guides are coming soon. For now, ping support and they can walk you through the manual config.)
Once SSO is on, new invites can require SSO sign-in. Existing users can link their account to their SSO identity from Profile.
Step 5. Require 2FA for everyone (recommended)
Strong recommendation for any workspace with real customer data: require 2FA workspace-wide. Open Settings → Organization → General Settings and toggle on Require two-factor authentication.
After you enable it, every existing user has to set up 2FA the next time they sign in. New invites need it as part of accepting the invitation.
If a teammate locks themselves out (lost phone, no recovery codes), a tenant-admin can reset their 2FA from the user's row on Team Members.
What you have now
After this page:
- Custom roles that match how your team actually divides work.
- Teammates invited to the workspace with the right role.
- SSO if your plan includes it.
- 2FA on every account (highly recommended).
This is the end of the Getting Started flow. From here, the day-to-day work happens on:
- Command Center for the executive view.
- Hardening Kanban for triage.
- Security Exceptions for formal risk acceptance.
- Reports when leadership asks for a PDF.
- Compliance Hub when an auditor asks for evidence.
Troubleshooting
Symptom: Teammate says the invite email never arrived.
→ Fix: Same drill as your own verification email. Check spam first, then ask IT to allow-list [email protected]. If still no luck, Team Members has a per-row resend action.
Symptom: I picked a role for a new user and they can't see anything when they sign in. → Fix: Their role probably has only scoped view permissions enabled but no cloud accounts assigned to the role. Open Roles and Permissions, select the role, scroll to Data Scope, switch to Specific Sources, and tick the accounts the role should see.
Symptom: The Invite User button is disabled but my plan says I have 10 seats and I only see 5 users. → Fix: Pending invites count toward your seat ceiling. Check the Team Members list for users with the Pending marker. Either revoke unused invites or upgrade the plan.
Symptom: I want to remove a user but the only option is Change Role. → Fix: Per-row removal lives behind a kebab menu (three dots) on the right side of the row. Click it for the Remove user option. Removing a user releases the seat immediately.
Symptom: A user with 2FA enabled lost their device. → Fix: A tenant-admin can reset 2FA for them from the user's row on Team Members. The user then sets it up fresh on their next sign-in.
Related
- Roles and permissions (the full RBAC reference)
- Plans and pricing (seat allowances per plan)
- Plan feature matrix (which plans include SSO and audit log)
- Command Center (where the team will spend most of their time)