Roles and permissions
Every action in Retrievy is gated by a permission, and permissions are bundled into roles. This page explains how to build custom roles, scope a role's data access to specific cloud accounts, and assign roles to users.
Open Settings → Organization → Roles & Permissions.
Before you start
- The Invite, edit roles, and remove tenant users permission (under the User Management group). Without it the Roles & Permissions entry is hidden from the navigation.
- A workspace with at least one user (you).
The default role
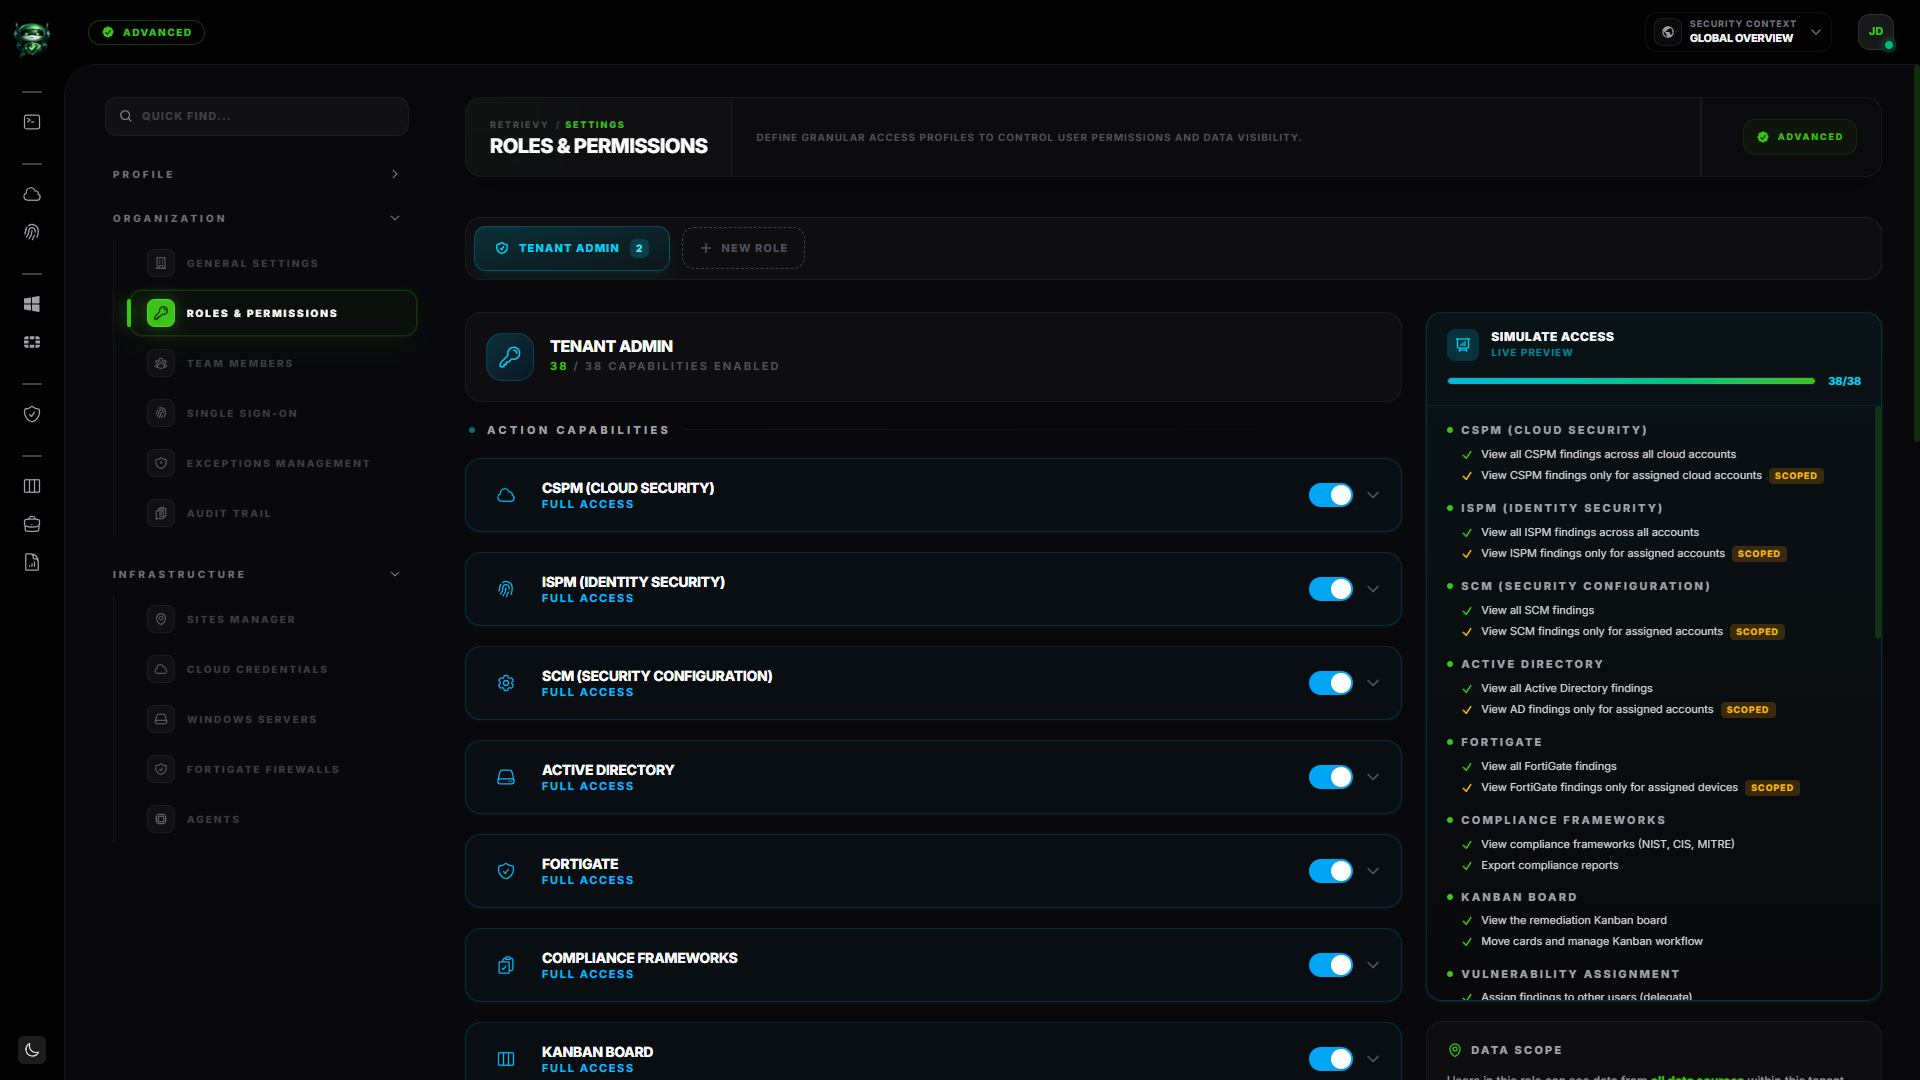
A fresh workspace ships with one role: tenant-admin. It carries every permission. It's a system role, marked in the UI with a shield icon, and cannot be deleted. Every other role is custom and is created on demand.
The user who created the workspace gets tenant-admin automatically. From there, you'd typically create scoped custom roles (Security Analyst, Compliance Officer, View-Only Auditor) and invite team members with those.
Creating a custom role
Click New Role in the top-right. The modal opens with the heading New Role and the subheading Define a custom access profile.
| Field | Required | Notes |
|---|---|---|
| Role Name | Yes | Between 2 and 50 characters. The placeholder is e.g. Security Analyst. The display name keeps your casing; the internal slug lowercases and replaces spaces with hyphens. |
Click Create Role. The role is created empty (no permissions yet) and the permission picker on the right activates.
The permission picker
The picker shows every permission Retrievy supports, grouped into module cards. Each card has:
- A header with the module name and a permission count.
- A master toggle to turn every permission in the module on or off.
- Individual permission rows with a checkbox and a description.
Permissions that scope data (the only for assigned… variants in each group) are flagged with an amber Restricted scope label, because picking them also enables the data scope picker further down the page (see Data scope below).
A live summary panel on the right of the page shows the role's effective grants as you toggle. When you're done, click Apply Permissions to save.
Full permission catalog
The canonical list, organised by the same module groups you see on the Roles & Permissions page. Each row gives the exact toggle label the UI shows and what enabling it grants the role.
CSPM (Cloud Security)
| Toggle in the UI | Grants |
|---|---|
| View all CSPM findings across all cloud accounts | View every CSPM finding across every connected cloud account. |
| View CSPM findings only for assigned cloud accounts | View CSPM findings only for cloud accounts assigned to the role (see Data scope). |
ISPM (Identity Security)
| Toggle in the UI | Grants |
|---|---|
| View all ISPM findings across all accounts | View every ISPM finding across every identity source. |
| View ISPM findings only for assigned accounts | View ISPM findings only for identity sources assigned to the role. |
SCM (Security Configuration)
| Toggle in the UI | Grants |
|---|---|
| View all SCM findings | View every SCM finding regardless of source. |
| View SCM findings only for assigned accounts | View SCM findings only for sources assigned to the role. |
Active Directory
The on-prem AD dashboard has its own permission group so you can grant AD visibility independently of other SCM sources.
| Toggle in the UI | Grants |
|---|---|
| View all Active Directory findings | View every AD finding across every domain. |
| View AD findings only for assigned accounts | View AD findings only for domains assigned to the role. |
FortiGate
| Toggle in the UI | Grants |
|---|---|
| View all FortiGate findings | View every FortiGate finding across every device. |
| View FortiGate findings only for assigned devices | View FortiGate findings only for devices assigned to the role. |
Compliance Frameworks
| Toggle in the UI | Grants |
|---|---|
| View compliance frameworks (NIST, CIS, MITRE) | Open the Compliance Hub and the three framework dashboards. |
| Export compliance reports | Export framework-level compliance reports. |
Kanban Board
| Toggle in the UI | Grants |
|---|---|
| View the remediation Kanban board | View the Hardening Kanban board. |
| Move cards and manage Kanban workflow | Drag cards between columns and use bulk actions. |
Vulnerability Assignment
The first toggle delegates findings to other users. The second is the admin force-release for stuck or stolen claims (and the cleanup tool for deactivated users).
| Toggle in the UI | Grants |
|---|---|
| Assign findings to other users (delegate) | Assign findings to other tenant users. |
| Force-release or reassign someone else's claim | Force-release a stuck claim or take over someone else's assignment. |
Remediation Projects
| Toggle in the UI | Grants |
|---|---|
| View remediation projects | Open the Remediation Projects index and any project's detail page. |
| Create new remediation projects | Open the create wizard and save a new project. |
| Edit, delete, and manage remediation projects | Mark items resolved, accept risk on items, finalise a project, delete a project. |
Security Exceptions
| Toggle in the UI | Grants |
|---|---|
| View security exceptions registry | Read the Security Exceptions registry. |
| Approve, reject, and manage security exceptions | Create exceptions via Accept Risk, edit lifecycle, revoke. |
Reports & Exports
The Reports module ships a single role-grantable toggle today. The Reports nav link is also subject to admin defaults; see Reports for details.
| Toggle in the UI | Grants |
|---|---|
| Generate and download PDF/SOW reports | Trigger every Executive, Technical, per-project, and drift export. |
Scans & Uploads
| Toggle in the UI | Grants |
|---|---|
| Upload scan result files | Upload scan result files (Agent or manual). |
| Trigger on-demand security scans | Trigger on-demand scans (Scan Now). |
Settings: Cloud Accounts
| Toggle in the UI | Grants |
|---|---|
| View cloud account configurations | View cloud account configurations. |
| Create, edit, and delete cloud accounts | Create, edit, and delete cloud accounts. |
Settings: Sites
| Toggle in the UI | Grants |
|---|---|
| Create, edit, and delete deployment sites | Create, edit, and delete deployment sites. |
Settings: Agent Tokens
| Toggle in the UI | Grants |
|---|---|
| View agent tokens and status | View agent tokens and fleet status. |
| Create, rotate, and revoke agent tokens | Create, rotate, and revoke agent tokens. |
Settings: FortiGate
| Toggle in the UI | Grants |
|---|---|
| View FortiGate device configurations | View FortiGate device configurations. |
| Manage FortiGate device connections | Manage FortiGate device connections. |
Settings: SSO
| Toggle in the UI | Grants |
|---|---|
| View SSO/SAML configuration | View SSO / SAML configuration. |
| Configure SSO providers and enforcement | Configure SSO providers and enforcement. |
Settings: Tenant
| Toggle in the UI | Grants |
|---|---|
| View tenant configuration | View tenant configuration (name, timezone, basics). |
| Modify tenant name, timezone, and settings | Modify tenant configuration. |
Audit Trail
| Toggle in the UI | Grants |
|---|---|
| View tenant audit logs | View the tenant audit log under Settings → Audit Trail. Hidden unless your plan includes Detailed Audit Trail. |
User Management
| Toggle in the UI | Grants |
|---|---|
| View tenant user list and profiles | See the tenant user list and profiles. |
| Invite, edit roles, and remove tenant users | Invite, edit roles, remove tenant users. Required to open the Roles & Permissions page. |
Data scope: scoped vs all
The two flavours of view permissions matter a lot in practice:
- A View all… permission gives the role visibility across every account, source, or device of that type.
- A …only for assigned… permission requires you to explicitly pick which accounts the role can see.
When you flip on any scoped permission for a role, the Data Scope section near the bottom of the page activates. It has a two-button toggle:
- All Data Sources is the default. Scoped permissions behave as full visibility.
- Specific Sources enforces the scope. Two checkbox lists appear: one for Data Sources (cloud accounts plus FortiGate, M365, Active Directory) and one for Agents (registered Retrievy Agents, Windows or Docker). Pick the specific entries the role can read.
If the role has any View all… permission enabled, the scope toggle goes to All Data Sources regardless of what scoped permissions are also on. View-all wins.
Inviting users and assigning roles
User management lives at Settings → Organization → Team Members. Two flows.
Invite a new user
Click Invite User. The modal opens with:
- A user email field.
- An Assign Role dropdown that defaults to tenant-admin. Pick the role you want the new user to land in.
Click Send Invite. The user receives an email with the invitation link. Once they accept, they land in the workspace with the assigned role.
Change an existing user's role
In the user table, click the Role button on the user's row. The Change Role modal opens with a dropdown of every available role. Pick one and click Update Role.
A user can only have one role at a time. If you need a hybrid (read-only on one provider but full access on another), build a custom role that combines the right permission slice instead of trying to stack two roles on the same user.
Editing and deleting roles
Any role can be re-edited by selecting it in the picker and using the same permission toggles. Apply Permissions saves changes.
Delete is only available for custom roles. The tenant-admin role is protected: its delete button is hidden and it carries a shield icon. When you delete a custom role the modal warns All users assigned to <role name> will lose their permissions. Users keep their accounts but their effective permissions drop until you reassign them.
Audit trail
Every role change is recorded in the tenant audit log. The events are:
- created when a role is created.
- permissions_updated when its permission set changes. Captures the before-and-after permission lists.
- deleted when a role is removed. Captures the permission list at deletion time.
User role assignments are also audited with their own updated event.
The audit log lives at Settings → Organization → Audit Trail (requires the View tenant audit logs permission and the Detailed Audit Trail plan feature).
Plan gating
The only RBAC-adjacent feature gated by plan is Detailed Audit Trail. Plans without it hide the Audit Trail permission group from the picker and the Audit Trail nav entry entirely. See plan feature matrix for which tiers include audit logs.
Empty state
If you ever wipe every role (rare; the seeder normally bootstraps tenant-admin on tenant creation), the page shows the empty state No roles configured with the message Create your first role to start defining access capabilities for your team. Only the New Role button is available.
Troubleshooting
Symptom: I gave a user View CSPM findings only for assigned cloud accounts but they can still see every cloud account. → Fix: The role probably also has View all CSPM findings across all cloud accounts (or another View all… permission) turned on. View-all overrides scoped. Disable the all-permission on the role and re-apply.
Symptom: I want a user to see only AWS account prod-aws-us-east-1 but I can't find a per-account toggle.
→ Fix: Enable the relevant scoped toggles (View CSPM findings only for assigned cloud accounts, View ISPM findings only for assigned accounts, etc.). Scroll down to the Data Scope section, switch to Specific Sources, and tick the cloud account.
Symptom: I can't open the Roles & Permissions page. → Fix: It requires the Invite, edit roles, and remove tenant users permission (under User Management). Ask your workspace admin to grant it or to make the role change on your behalf.
Symptom: I deleted a custom role and now my team members can't do anything. → Fix: Their role assignment was removed. Open Settings → Organization → Team Members, click Role on each affected user, and assign them a replacement role.
Symptom: I can't see the Audit Trail permission group in the picker. → Fix: Your plan doesn't include Detailed Audit Trail. The group is hidden until that feature is enabled. See plan feature matrix.
Related
- Security Exceptions (requires Approve, reject, and manage security exceptions)
- Hardening Kanban (requires Move cards and manage Kanban workflow)
- Remediation Projects (requires Create new remediation projects plus Edit, delete, and manage remediation projects)
- Reports (requires Generate and download PDF/SOW reports)
- Connect an AWS account (requires Create, edit, and delete cloud accounts)
- Install the Retrievy Agent on Windows (requires Create, rotate, and revoke agent tokens)