Team members
The Team Members page is the operational home for your workspace's user list. Everything a tenant-admin does to people inside the workspace happens here: invitations, role changes, access blocking, and removals. The page lives at Settings → Organization → Team Members.
This is the reference page that covers every action. For the broader walkthrough of bringing your team in for the first time, including how to design custom roles, see Invite your team.
Before you start
- The Invite, edit roles, and remove tenant users permission, set on your role under Settings → Organization → Roles & Permissions. Tenant-admins have it by default.
- Enough seats on your plan for any new invitations. Pending invites count against your seat allowance the moment you send them, not when they are accepted. See seats and quotas.
- The custom roles you want to assign already created in Settings → Organization → Roles & Permissions. See Roles and permissions.
The page at a glance
Open Settings → Organization → Team Members. The page H1 reads Team Members.
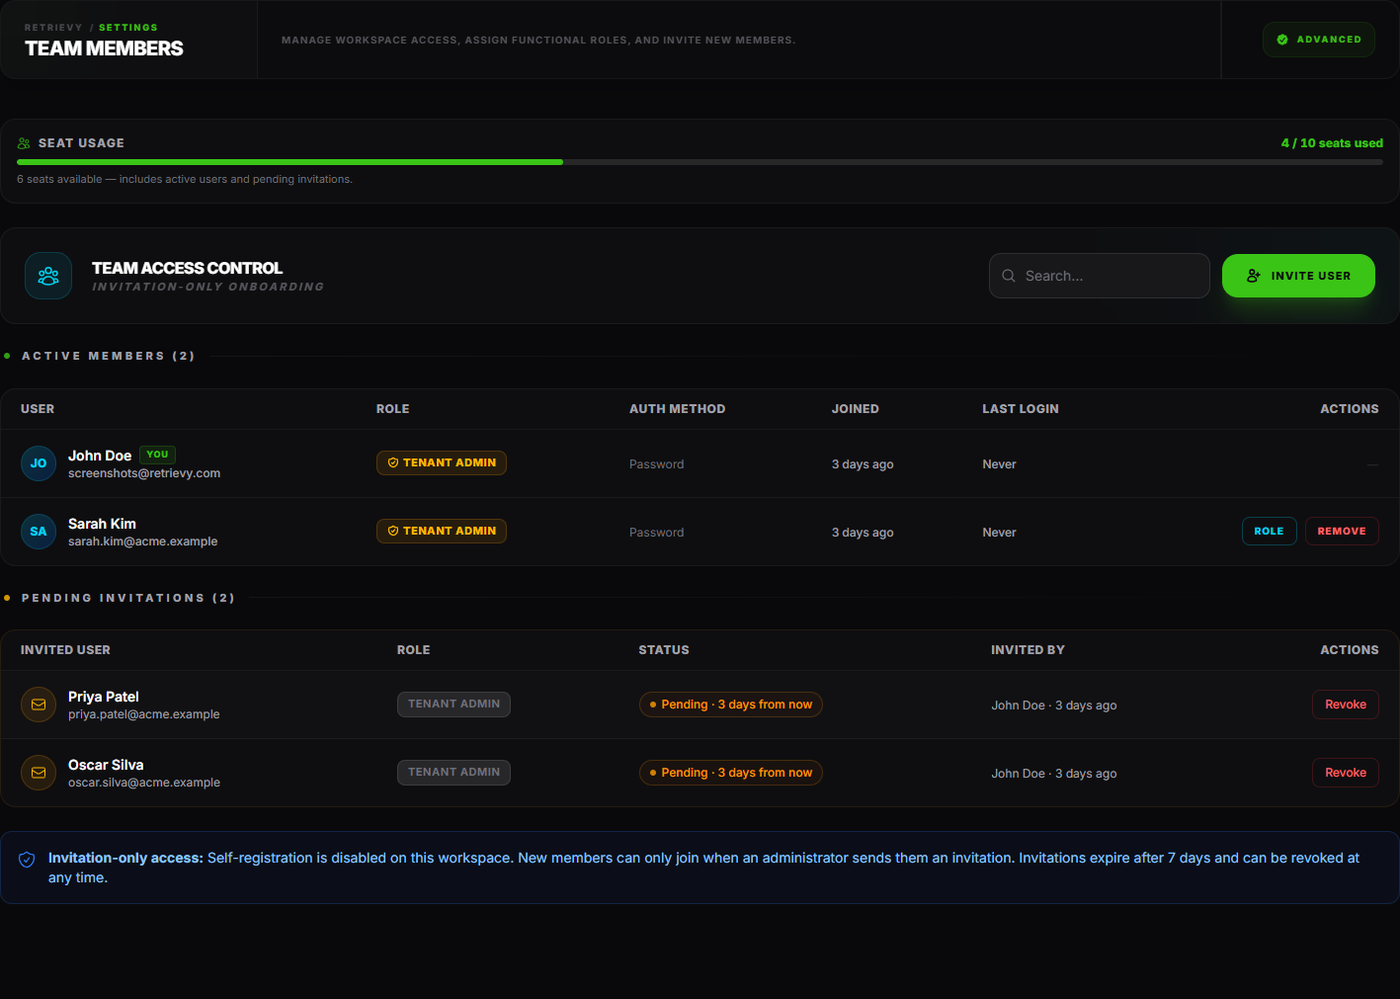
The page has four parts:
- Seat meter and search bar at the top, showing
N / M seats usedand a quick-find box that filters by name or email. - The Invite User button in the top-right (or its disabled twin Seat Limit Reached: Upgrade when the workspace is at its seat ceiling).
- The active users list with one row per teammate.
- The Pending Invitations panel listing every invite you have sent that has not been accepted yet.
Invite a teammate
-
Click Invite User. The invite modal opens.
-
Fill in the three fields:
Field Notes Email The recipient's work email. The invite link is sent here. Must be unique in the workspace and have no pending invitation already. Name Two to one hundred characters. Shows on the user row and in audit-trail entries until the invitee signs in and overrides it. Assign Role Dropdown listing every role the workspace has. Defaults to tenant-admin. Set it to the least privileged role that lets the person do their job. -
Click Send Invite.
The new row appears immediately in the Pending Invitations panel below the active users. It carries a Pending label and a relative-time hint such as Pending · in 7 days showing when the link expires.
If the workspace is at the seat ceiling, the modal returns the inline error Seat limit reached. Upgrade your plan to invite more team members. Resolve it by upgrading the plan or revoking unused pending invitations.
A seat is counted as soon as you send the invite. If you have 10 seats, 6 active users, and 4 pending invitations, the meter reads 10 / 10 and the Invite User button is disabled until either someone accepts (rolling the pending count into active) or you revoke a pending invite.
Resend or revoke a pending invitation
Each row in the Pending Invitations panel has two actions on the right:
- Resend rotates the invitation token (the old link stops working) and re-sends the email with a fresh 7-day expiry. Use this if the recipient says the email never arrived or if the original link expired.
- Revoke deletes the invitation. The seat returns to the available pool immediately. A confirmation prompt asks Revoke this invitation? before the action commits.
Both actions write a row to the Audit trail so the team can see who touched the invitation and when.
Change a user's role
- On the Team Members page, find the user's row.
- Click the Role button on that row.
- The Change Role modal opens with a dropdown of every role the workspace has. Pick the new one and click Update Role.
The change takes effect immediately and writes an audit-trail entry. The user's next page load reflects the new permissions; there is no need to sign them out.
You cannot change your own role from this modal. Retrievy blocks the action with the inline message You cannot change your own role. If you are the only tenant-admin and need to step down, invite another tenant-admin first, then have them change your role.
Each user carries one role at a time. If you need a hybrid (read-only on one provider but full access on another), create a custom role that combines the right permission slice in Roles & Permissions rather than trying to stack two roles on the same user.
Block or restore a user's access
Use Block when you need to suspend a user immediately, for example during an off-boarding or after a security incident. Blocked users:
- Cannot sign in to the workspace.
- Have their existing sessions terminated the moment the block takes effect.
- Stay visible on the user list with a red Blocked chip next to their name.
To block a user:
- Find the user's row.
- Click Block on the right side of the row.
- The Block Access confirmation modal opens. Read the consequences (sign-in blocked, sessions cleared) and click Confirm Block.
The row updates instantly with the Blocked chip and the action button flips to Unblock.
To restore access, click Unblock on a blocked user's row. The Restore Access modal asks for confirmation. After confirming, the user can sign in again on their next attempt; existing sessions stay terminated until they re-authenticate.
You cannot block yourself. The Block button is hidden on your own row.
Blocking preserves the audit trail. Removing a user who has already signed in is not supported. See Remove a user below.
Remove a user
Removal is reserved for users who have never signed in. The most common case is an invitation that was accepted but the user has been replaced before they actually used the workspace.
- Open the kebab menu (three dots) on the right of the user's row.
- Click Remove user.
- The Remove User? confirmation modal opens. Click Remove User to confirm.
If the user has signed in at least once, Retrievy refuses the removal with the toast Users who have already logged in cannot be deleted. Use "Block" instead. Block them instead so the audit trail stays intact.
Removing a user releases their seat immediately.
What the seat meter shows
The meter at the top of the page reads N / M seats used where:
- N = active users + pending invitations.
- M = the seat allowance on your current plan.
The meter is lime when you are under the cap, amber when you are within one seat of the cap, and red when the cap is hit. Hovering shows the breakdown between active users and pending invitations.
When the cap is hit, the Invite User button is replaced with Seat Limit Reached: Upgrade and the page surfaces the message Seat limit reached on the [plan name] plan. Upgrade your plan to invite more team members. Click through to Subscription Management to resize the plan.
What gets recorded
Every action on this page lands on the Forensics page (Settings → Organization → Audit Trail) if your plan includes the audit log feature:
| Action | What the audit row shows |
|---|---|
| Send invitation | Inviter, recipient email, and role assigned. |
| Revoke invitation | Who revoked, when, recipient email, and the role the invitation carried. |
| Resend invitation | The fact that the link was rotated and the new expiry date. |
| Change role | Old role and new role, plus the affected user. |
| Block access | The user moved from active to blocked. |
| Restore access | The user moved from blocked back to active. |
| Remove user | Who was removed and by whom. |
The audit log feature is included on Advanced and Build Your Own plans. On Essentials, the actions still happen but no audit row is written. See the plan feature matrix.
Troubleshooting
Symptom: This user already has an account in this workspace. → Fix: The email matches an existing user. They do not need a fresh invitation. Open their row and check whether they are blocked. If they are, unblock them and ask them to sign in.
Symptom: A pending invitation already exists for this email. → Fix: Open the Pending Invitations panel, find the existing row, and either Resend (if the recipient lost the email) or Revoke the old one before sending a new invite with different parameters.
Symptom: Seat limit reached. Upgrade your plan to invite more team members. → Fix: Either revoke unused pending invitations to free seats, or resize the plan on Subscription Management. The seat meter shows the breakdown so you can decide which.
Symptom: I removed a user but Retrievy says Users who have already logged in cannot be deleted. Use "Block" instead. → Fix: Removal is restricted to users who have never signed in. Block the user instead. Blocking terminates their sessions immediately and preserves the audit trail.
Symptom: I changed a teammate's role but they still see the old menu items. → Fix: The change takes effect on their next page load. Ask them to reload the workspace tab. If the old menu items persist after a reload, they may need to sign out and back in.
Symptom: I cannot see the Settings → Organization → Team Members option. → Fix: The page requires the Invite, edit roles, and remove tenant users permission to manage the team, or the View tenant users permission to read the list. Confirm your role has one of those toggles under Settings → Organization → Roles & Permissions.
Related
- Invite your team for the broader onboarding walkthrough.
- Roles and permissions for the role catalog and how to build custom roles.
- Seats and quotas for how seats are counted and what happens on a plan downgrade.
- Audit trail to inspect the history of team-member actions.
- Subscription management to upgrade or resize your plan.